Showing posts with label nail art. Show all posts

Wednesday, June 4, 2014

I Am Cyborg


I have been meaning to do some electronics themed nails for ages, so yesterday I made these printed circuit board inspired false nails using genuine electronics components. I am really pleased with the way they turned out!


I used two coats of Rimmel 60 Seconds in shade Jungle Fever (Poundworld) as the base colour as it is the closest shade I have to a PCB green. I used a brass coloured metallic Vallejo acrylic model paint and a fine brush to paint the circuits. Once everything was dry, I trimmed the wire off some assorted resistors and an LED and attached them to the nail using superglue. If you want to recreate this look but don't have a big tin of electronics components like I do, resistors and LEDs are cheap and can be bought individually from online suppliers or your local Maplin or independent hobby-radio store. The total value of all the components on these nails is probably about £1.

Tip: nail glue and cheap superglue are exactly the same stuff, cyanoacrylate, but when buying from discount shops cheap superglue is often fresher than cheap nail glue (cyanoacrylate starts to get less effective 12 months after manufacture) because they sell much more of it.

I used L.A.Colors Top Coat on the nails after I'd glued on the components. Using the top coat afterwards helped disguise any areas where I'd been sloppy with the glue.


What do you think of these nails? Have you ever created nail art using unusual materials?

Thursday, May 15, 2014

Industrial Revolution


Sorry it's been a week since my last post. I was giving my nails a short break from polish and acetone while I try to sort out my dry nails and cuticles so there wasn't anything to blog about until today. You should be getting quite a few posts from me in the next few days though.


The museum I volunteer at has a huge building full of a variety of historical steam powered machinery and I decided to use this as my inspiration. I stole some watch parts from my husband's model building stash. He has a big tub of tiny gears so I don't think he'll miss them. I used two coats of 17 Fast Finish polish in shade Smokey Marble, which is a dark semi-metallic steel colour that looks exactly like the oily finish on the old steam engines. I picked this polish up for 50p in the January Boots clearance sale as it is one of the old 17 polishes (before they became Seventeen) and to be honest it's a pain to apply. It starts off a nice consistency but it dries much too fast, so before you've finished your first brush stroke it has become a thick, stringy gloop.


I applied the cogs over a coat od Konad Special Top Coat, then used another coat over the top. I'm afraid my trusty bottle of top coat is getting a bit low and it is now thick and bubbly so I think I'll have to invest in a new one.

I rather like these slightly steampunk looking nails. What do you think?

Thursday, May 8, 2014

Galaxy Nails


These are the space themed nails I wore for my first shift as a volunteer at the science museum.

My poor nails have had a bad week. I ripped off the entire free edge (and a bit extra, ouch!) of the nail on my ring finger in a handbag rummaging incident and I'm still having problems with my index finger nail splitting along my old scar, so I'm keeping my nails ultra short until the most damaged areas of nail have grown out. In fact I've had to trim my nails even more since these photos were taken, so they really are nubbins now. Because I didn't have much space to work with I thought I'd keep my nail art simple. I've never attempted galaxy nails before, but they are so easy to do and I'm quite pleased with the way they came out although they photographed really badly.

I used one coat of black polish, Jess in shade Midnight, for the base followed by a coat of Jess Flash Harry, which is a holographic silver, red, blue and green glitter topper. Jess polishes are exclusive to Poundland and are currently my favourite budget polish brand.


I dabbed on a variety of other polishes using the corner of a makeup sponge to create a nebula effect. I used some of the polishes that my Mother-In-Law gave me on Monday, including a mystery shimmery red shade, Constance Carroll Waterfall (a pale green frost) and Avon Café Au Lait (a light shimmery bronze). I dabbed on a little more Flash Harry glitter in some areas then used used Maybelline Purple Aluminium, which although it looks blue in the bottle is actually a dark silver-flecked purple polish that I received as a Christmas gift about fifteen years ago and is still going strong, and Koh Phangan by Technic, which is a bright blue crelly, to subdue some of the areas where I had gone overboard with the glitter. I topped everything with a coat of Konad Special Top Coat.


Do you have any ideas or suggestions for nail art for very short nails?

Wednesday, May 7, 2014

Magnetism


This is just a quick post featuring the last two polishes I bought before I started operation "No More Polish Until I Give Up Smoking". Poundworld was full of bottles of Sally Hansen Complete Salon Manicure in loads of shades this weekend so I picked up Malbec which is a deep plummy purple.

As I've only been interested in nail polish for less than a year, I missed out on a lot of the special effect polish trends of recent years. Instead I get to discover these former trends in pound shops for a fraction of their original price! I picked up a red Sally Hansen Magnetic polish months ago and was fascinated by the effect, so when I saw shade Purple Magnitude in Poundworld I grabbed it.


This polish is a lovely metallic lilac shade even without using the star shaped magnet in the polish cap, and when the magnet is held over wet polish it turns some areas of the polish silver and other areas a deeper purple, giving an optical effect that looks as though it has depth.


I used false nails and three coats of Purple Magnitude, using the magnet on the final layer on the thumb, middle and little finger nails. On the index finger I used two coats of Malbec. On two of the nails I added dots followed by Konad Special Top Coat.

What do you think of magnetic nail polishes?

Wednesday, April 23, 2014

Primark Nail Art Pens


On Monday I braved the bank holiday crowds and headed to Primark to pick up some nail art pens. I'd read some good reviews of the P.S. Love nail art pens so I had to try them for myself.

There are two types of nail art pen available in Primark. The P.S. Love sets which cost £2 for a pack of three and are available in a Silver/Gold/Turquoise pack, which I bought, and a Black/White/Pink pack, which had all sold out in my local store. Primark also has some packs containing two slightly smaller nail art pens with a tube of matching rhinestones attached to the base of each one, also for £2. These nail art pens are not P.S. Love and are labelled Nail Art Get Creative. They were only available in a White/Red pack (other colours may be available). I'd not read any reviews of these pens but I thought I'd give them a try.

The lids and nibs of the pens are identical for the two types of nail art pen, consisting of a unscrewable striping brush section and above that a push-fit lid covering a thin metal nib. The pen tubes are squeezy, so be careful not to squeeze them as you remove the pen lids (which are tight fitting) otherwise you'll squirt polish everywhere. It is also important that when you are removing and replacing the lids you keep them directly in line with the nib to avoid bending the thin metal. You use the pens by gently squeezing the tube as you draw. The harder you squeeze, the thicker and blobbier the line you draw will be. There is no need to press the nib onto the surface of your nail as you would with a marker pen (you'd probably damage them that way), just gently touch the surface with the nib. As you can see in the photo below there is a little imperfection in the plastic moulding near the nib on some of the pens, but this doesn't affect the way they work at all.


The P.S. Love nail art pens are really excellent, just as the reviews I'd read claimed. The turquoise polish is totally opaque even over black, and the gold and silver are almost as opaque. The P.S. Love pens have exactly the right consistency to draw neat, thin lines and are a pleasure to use. It took me a while to get the hang of it, but by applying just a tiny bit of pressure you can draw lines almost as thin as a fineliner pen.

The Nail Art Get Creative pens contain slightly less polish and the formula is not nearly as good as the P.S. Love pens. The polish is very thin and runny which means it is harder to control the flow and the nibs splutter regularly, spraying flecks of polish and creating bubbles. Because the formula is so thin it also dissolves your base polish slightly which can muddy the colour of your lines. The white pen is significantly better than the red pen, and although it is difficult to use it is quite opaque over black. The red pen is not opaque at all and will only be useful over bases that are lighter than it, and it is so runny that it is almost impossible to draw neatly or do any detailed work with it. I imagine I will get some use out of the white pen (albeit while swearing at how difficult to use it is), but I probably won't be using the red pen again. I might try refilling the tube of the red pen with a more opaque polish from my collection to see how that works. At least these pens came with lots of sparkly red and iridescent silver rhinestones I suppose!

The picture below shows the lines that the different pens draw. I'm afraid it's not the neatest nail art but I was still getting used to squeezing the pen as I was drawing.


So, my verdict is buy the P.S. Love nail art pens! They are fantastic and a very low price for the quality you get. I know I'll be picking up the Black/White/Pink set when they get more in stock. I wouldn't bother with the Nail Art Get Creative pens, they will only disappoint.

Saturday, April 19, 2014

Earthy Earth Day Nails


This is the nail art I created for the Earth Day challenge on Nailpolis. It was supposed to be leaves and vines in a style inspired by Aboriginal Australian art. I quite like the nails but they didn't turn out quite the way I'd planned and I don't think they scream Earth Day. Oh well.

I used Rimmel 60 Seconds in shade Captain Khaki for the base. Poundland have a lot of Rimmel polishes in stock at the moment so I picked this shade up on Friday when I realised I didn't own any earth-tone polishes to use for my Earth Day nails.

I used a dotting tool and NYC High Line Green, Maybelline Pow Green, MUA All Nude and Technic Canary to do the designs. I used Limited Collection Matte Top Coat to finish them off.


I think the most surprising thing about this nail art is that I now own a dark khaki-brown nail polish. Yuck!

What's the ugliest shade of nail polish you own?

Thursday, April 17, 2014

Going Dotty


I treated myself to a set of dotting tools from Born Pretty and here is my first attempt at using them. At first it was a little tricky to find the right amount of polish to use with the dotting tools, but once I got going these nails were so simple to do that I even managed to do my right hand to match.


I used two coats of an unnamed turquoise-leaning peppermint coloured P.S. polish from the box of four polishes I picked up from Primark last week for £2. This polish is an almost identical shade to Pool Party from the Technic Pretty Pastels range but the P.S. polish is an opaque two-coater unlike the sheer Technic polish. It has a smooth, easy to apply formula and dries to a glossy finish but it is really stinky which is something I've found with all the P.S. polishes I've tried.

I used Rimmel Lycra Pro in shade Blue Vogue (Poundworld) and MUA All Nude (£1, Superdrug) to do the dots and finished it all with Konad Special Top Coat.


Even though the dots aren't neat and perfectly placed, I've really enjoyed wearing these nails. They just look so happy! They remind me of a t-shirt I owned in the 90s that had a big blue and turquoise tie-dyed circle on the front.

What do you think? Have you tried any nail art using dotting tools?

Sunday, March 30, 2014

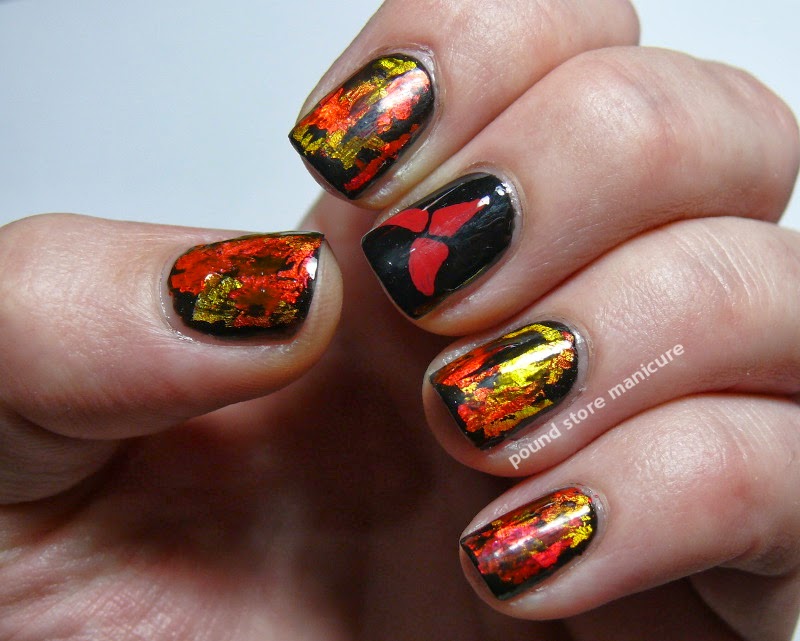
Klingon Nails


HoSghaj nItlhpach! Which is Klingon for "Powerful fingernails".

On Saturday I was supposed to be joining my husband and his friends to drink lots of coffee and play a Star Trek tabletop war game (yes, that is exactly as geeky as it sounds). I always play as the Klingons so I decided to give myself some fierce Klingon themed nails. In the end I woke up on Saturday with a cold and as I didn't want to spread my germs about, I never found out whether these nails improved my game and terrified my opponents.


I started with two coats of black Jess polish (exclusive to Poundland) in shade Midnight. It's impossible to read the label in the photo as the writing is black on black. This polish really is excellent, very opaque and if you are careful you could just use one coat. While the second coat was still tacky I applied some patches of red and yellow foil from this multicoloured gradient holographic foil from Born Pretty. You can use adhesive to stick this foil on, but tacky polish worked well for the distressed look I wanted. To fill in any big gaps I applied a coat of clear polish (Voltage by L.A.Colors, £1 from my local pharmacy) and when that was tacky I applied more foil to those areas.


On my left middle finger I painted the Klingon symbol with some acrylic paint and a fine paintbrush. As I was experimenting, I decided to see what the foil looked like if I brushed a little more black polish (from an brush with hardly any polish on) over the top on my left hand to distress it further. I topped all my nails with Konad Special Top Coat from a hard glossy finish. I really like the look of the foil on both of my hands and I can't wait to try some of the other colours.


Here you can see the difference between the foil on my left and right hands.


I like to think that a powerful and fabulous female Klingon warrior would wear nails like this, but I imagine that Klingons don't agree with frivolous things like nail art!

Friday, March 28, 2014

The Lacquer Legion - Lucky Heather


The Lacquer Legion is a monthly nail art challenge and this is the first time I have taken part. The theme for March is "Lucky".

I took my inspiration for this nail art from heather. According to folklore the heather plant brings good luck and white heather is luckiest of all (hence the accent nail), plus Heather is my middle name so it seemed rather appropriate. There was a perfect heather-like design on the P48 plate that came with one of the Allura nail stamping sets I picked up last week at Poundland.


I used three coats of MUA All Nude, a warm creamy white shade (£1 from Superdrug) then sponged on a gradient with Rimmel Sweet Lavender (£1 from Poundworld) on most of my nails. I stamped the heather design three times on each gradient nail using MUA Frozen Yoghurt (which looks nothing like the colour shown on the website). I finished all my gradient nails with a coat of P.S. Matte Top Coat (£1 from Primark). I was really impressed that the matte top coat didn't smudge the stamping at all. For my accent nail I used two coats of a purple Primark P.S. polish (£2 for a set of 4) and stamped once with white Konad Special Polish followed by a coat of Konad Special Top Coat.


I'm really pleased with the way these nails look. They have a romantic, vintage feel to them. They remind me of the windswept purple moorland near my home.

After I'd already been wearing these nails for 24 hours I then spent two hours gardening, weeding, digging in compost and potting up plants with my bare hands. Even after a vigorous scrub with a nail brush the nails still looked perfect - not a chip in sight! I'm so impressed with the quality of all of these polishes and I've found that MUA polishes in particular seem to be almost unchippable.

Wednesday, March 26, 2014

The Weekly Haul - Jess Nail Polish


Jess is a new budget nail polish brand exclusive to Poundland with an exciting selection of cremes and glitters, all available for (surprise surprise) £1 a bottle. Today I'll be doing a review of two of the creme polishes, Brazen and All That Jazz.


The polishes come in 9ml bottles labeled as Made in UK, and the only criticism I have of the packaging is that the ingredients are not listed. All That Jazz is a neon primary blue. It's quite an unusual shade and although I own a lot of blue polish I have nothing similar to this. Brazen is a bright, almost neon, blue-leaning emerald green. My camera has a real problem photographing bright and neon shades accurately and I tried every background colour and type of lighting I could think of to make these colours pop, but with no luck. In real life the green is a saturated, rich shade much brighter than the washed out shade in the photos and the blue is also richer and brighter than it looks here.

Both polishes apply smoothly and are very opaque for budget polishes. The brushes are a little narrower than I prefer but the caps are easy to hold. Both shades require two coats for total coverage and dry quickly. They dry to a really glossy finish that seems pretty chip resistant. I wore these for 24 hours without top coat and despite being bashed around aplenty they stayed looking perfect. The quality of these cremes is much better than the Technic cremes I own and as good or better than the best Primark P.S. shades I've tried. I'm really impressed with these polishes and I have a feeling I will be buying quite a lot of Jess shades!


I used two coats of Brazen on my index, ring and little fingers and two coats of All That Jazz on my thumb and middle fingers, then used a floral pattern from Born Pretty plate QA59 to stamp some of my nails with white Konad Special Polish. These photos are all taken without any top coat to show how glossy these polishes really are!

I highly recommend seeking out Jess polishes if you have a local Poundland. These photos just don't do these lovely shades justice! I also picked up a few interesting Jess glitter polishes which I am saving for the next "Weekly Haul" post and I really hope that they impress me as much as the Jess cremes have.

Sunday, March 23, 2014

Try Out All The Things!


My inner six year old thinks that this manicure is the most amazing thing ever.

I got carried away in Poundland this weekend. It started with buying some of the new and exciting Poundland-exclusive Jess polishes (which will be reviewed in Thursday's "The Weekly Haul" post), and then, giddy and overstimulated by glitter, I ended up buying four different nail art sets to try out too. I picked up a pack of 12 little glass vials of caviar beads, a wheel containing a selection of tiny fimo butterfly slices and two stamping kits with different plates, all from a brand called Allura.


Back when my nails started featuring stamped patterns and glitter for the first time, I told my husband that if I ever started sticking "gaudy plastic crap" to my nails, he was to stage an intervention. I'm expecting him to check me into rehab any time soon!

When I got all my goodies home, of course I wanted to try them out. The sensible, adult part of my brain told me that I should just pick one thing to try because if I used them all together it would just be tacky and hideous. I ignored my sensible, adult brain and set to work on my nails like a kid in a sweet shop. As I had butterflies and the stamping plates mainly featured flowers, I decided to go with a summer garden theme.

I started with two coats of Constance Carroll Diamond Shine in Neon Green, which is actually more lime than neon (bought last year for £1 for a pack of two at Poundworld). I was planning to use the "seran-wrap" marble technique, but I discovered that we'd run out of cling-film so I improvised by using a plastic shopping bag which seemed to do the trick. I used a Jess polish in shade Brazen which is a bright emerald green (not as teal as it looks in the photo) for the marbling.


I chose to use the Allura stamping set with plate P21. The stamper itself worked perfectly and is very similar to the Konad one I own. The scraper has a plastic blade, works well and I actually prefer it over the Konad metal bladed scraper I have. The plates aren't as finely detailed as some other plates, but I tried several of the designs and they transfer very well. They metal is thinner than other plates and the edges are very sharp (no plastic backing), so be very careful when taking them out of the packaging and handling them. I used white Konad Special Polish for the stamping.

If you are interested in trying out nail stamping I would definitely recommend these Allura sets. For just £1 they contain everything you need to get started except polish. I recommend NYC Foil Explosion polishes (although the orangey shade isn't supposed to be as good) as excellent, reasonably priced polishes for starting stamping and they are often available in multibuy deals at Superdrug.

The Allura caviar set contains a nice range of colours and finishes including metallic, pearl, transparent and opaque beads. I made a mix of the dark green metallic, light green metallic and silver caviar and sprinkled it on top of a thickish coat of the Constance Carroll polish on my ring finger nails. After patting it down and waiting for it to dry I covered it with a coat of Konad Special Top Coat. The colour of the caviar didn't bleed or come off with the top coat and even after 24 hours of wear they have stayed put except at the very tips of my nails. They seem to be good quality for the price.


I have always thought that fimo slices for nail art are rather cute (especially the fruit ones) but I could never really see myself wearing them, but then in my pound store frenzy I saw these little butterflies and thought why not! There is a good selection of colours and designs in this set, some of them are more realistic looking and others are quite cartoony, and the set also contains a nail file and an orange stick. I put a coat of Konad Special Top Coat on my thumb and middle finger and placed the butterflies using the orange stick dipped in a tiny amount of top coat. The slices are quite thin and even, but they don't bend around the shape of the nail very well, so another coat of the top coat was needed to smooth over the edges so they wouldn't catch on things (any top coat that dries quickly to a hard finish would do). 24 hours later all the butterflies are still firmly attached to my nails and haven't caught on anything.


I'm very impressed with the quality of all the Allura products I bought. The nail art I created with them is very over-the-top and silly, but it makes me smile. I know that the six year old me would have wanted to wear nails like this every day!

Thursday, March 13, 2014

P.S. Pop Art Skittles


I bought a box of four P.S. polishes for £2 from Primark at the same time as I bought the very exciting matte top coat from the last post. The bottles are 6ml each, so about half the size of a full sized polish. There were three or four sets like this with various colour schemes and the one I chose contains a lavender, a rich purple, a neon pink and a bright red.


Here I have two coats each of the red (thumb), lavender (index finger), purple (middle and little fingers) and pink (ring finger):


The pink looks like a bubblegum colour in this photo, but in real life it is a vivid neon that my camera is unable to capture. The red is similarly neon-bright.

I was really impressed with the lavender and purple polishes. They were both highly pigmented and opaque in one coat and they dried with a nice glossy finish.The pink is a shade I would never usually wear and was a little more streaky to apply, but was totally opaque in two coats. The red was rather disappointing as it was really sheer and was only just opaque after three coats. It seemed to have a totally different formula than the other polishes in the set. Both the red and pink polishes dried to a satin finish. The tiny bottle caps and brushes are tricky to handle but all the polishes were smooth and easy to apply.

The colours of the swatches were so bright that I thought I'd turn them into a pop art inspired skittles manicure.

The formulas of the purple and lavender polishes were excellent, easily the best I've come across in a budget-brand polish, and it got me wondering if they would work for stamping. It turns out they are not bad at all - not completely opaque, but better than any other non-metallic polish I've tried that isn't a special stamping polish. I used Cheeky Jumbo plate N for the stamping, and stamped the purple on the lavender and vice versa. I topped all my nails with Konad Special Top Coat to make them all super glossy, then used some striping tape and the P.S. Matte Top Coat I was raving about in the last post to add some diagonal stripes to my thumb, ring and little fingers. I still really love this top coat and I think I'll be picking up another bottle next time I'm in Manchester as they only contain 7ml and I have a feeling I'll be using a lot of it!


This manicure is far brighter and bolder than anything I'd usually wear, but I quite like it. Please excuse the dry cuticles. I had put on handcream to try to disguise them, but that just caused fluff to stick to me, as you can see in the photos!

Sunday, March 9, 2014

Midnight in Morocco


After being so impressed with the Born Pretty stamping plate I used for my last manicure I decided to try out one of the designs from QA65, the other plate I bought.

I picked up a bottle of Rimmel Lycra Pro in Poundworld last week thinking it was a black polish, but getting it out in the sunlight and reading the label I realised that it was Blue Vogue, a rich midnight blue. I decided to use it as a base for this manicure and it's fantastic - perfect coverage in one coat, quick drying and super glossy.

I chose a stamp design which reminds me of Islamic tiles and made me think of the photos my parents brought back from their holiday in Morocco. I used NYC Foil Explosion in Aqua Mystic (often available as a 2 for £2.49 deal at Superdrug) which is a fantastic polish for stamping. Just as with the last Born Pretty plate I tried, the stamps came out perfectly. This plate was only $0.99, an absolute bargain, so I have a feeling I'll be treating myself to a few more Born Pretty stamping plates in the future.


The only problem I have found with the Born Pretty stamping plates is the designs are quite small. My nails are quite short and narrow and the designs just cover my finger nails, but my thumb nail is slightly too wide. Instead I used some silver diamond shaped glequins (a name I have borrowed from The Nailasaurus to describe sparkles that are too big to be glitter and too small to be sequins) from this set (#4) to make a star shape on my thumb nail.
I topped everything with a coat of Konad Special Topcoat, but unfortunately I didn't wait for my base coat to dry enough on my thumb, so the glequins shifted and the base colour dragged over the glequins a bit. Oops!

I also managed to catch the ends of my nails before they were fully dry so there are a few little wrinkles on my index and ring fingers. The moral of this story is don't drink a massive mug of tea while you are painting your nails - nature will call before your polish dries!

The shine on the topcoat makes it a bit difficult to see what is going on with my nails, so here are a couple of close up shots of my thumb and fingers without the direct lighting. The dark blue is a pain to clean up if you make a mistake, so of course I managed to get it all over my cuticles!


I love this pattern and colour combination, although I'm not so happy with the glequins on my thumb. What do you think?

Friday, March 7, 2014

Peppermint Paisley


Last year I fell in love with some swatches of Illamasqua's Fragile, a gorgeous polish that is way out of my price range. I realised that I could create a similar look by layering a sheer pastel polish with black glitter, and for a while I wore speckled egg nails in a different shade every week. I decided to use a more subtle version of this look for the base of this manicure.

I started with two coats of Pool Party from the Technic Pretty Pastels collection (Technic polishes are available for £1 a bottle at branches of Bodycare and other discount stores, or for £1.25 from www.lovethymakeup.com). Pool Party, like many Technic polishes, is thin and sheer. It's almost jelly-like, takes four coats to become opaque and it dries really quickly which means it is great for layering with glitter. It's a lovely pepperminty turquoise colour and I wear this polish quite a lot.

I added a coat of Violet by Chit Chat (a Poundland purchase). Chit Chat is another budget brand, apparently made by the same people as Technic. This glitter polish is a bluey purple with small and medium hex glitter. The violet glitter gives a more subtle speckled effect than the black glitter I usually use.

After another two coats of Pool Party the purple glitter shows through as a matte blue colour. These nails are pretty enough to wear as they are.


A month ago I discovered the Born Pretty store, ordered some goodies and last week my order arrived. I bought striping tape, some diamond shaped glequins and two stamping plates.

I've never used striping tape before so I thought I'd start simple. I found some Sally Hansen Sugar Coat textured polishes in Poundland last week and I thought the white Sugar Fix would work well with the peppermint colour and the texture would add some interest to horizontal stripes.

On the rest of my nails I used the paisley pattern from Born Pretty stamping plate QA59. I was pleasantly surprised with the quality of the plate. It's a really detailed design and it stamped just as well as the Konad and Cheeky plates I own, even with the slightly uneven nail surface due to the glitter. I used white Konad Special Polish for the stamping - it came as part of a Konad stamping set that I picked up cheap on Amazon. I used Konad Topcoat on the stamped nails.


I know it's not the neatest manicure - the stripes are messy and the skin around my nails is horribly dry at the moment - but I rather like these nails. What do you think?