Tuesday, April 29, 2014

Numbers


Just a quick post for some quick and simple nails. I've been training to be a volunteer at a science museum and today was my final training day before I am let loose on the visitors. I've decided I'll wear science and engineering themed nails whenever I'm volunteering so I thought I'd start that tradition today. A while ago I used some Born Pretty loyalty points to buy this QA9 stamping plate featuring letters and numbers (it only ended up costing me three pence!) so I went with a mathematical theme.

I used  two coats of Maybelline Color Show in shade Cool Blue (usually available in 3 for 2 deals at Boots) for the background and stamped the nails using blue Konad Special Polish. On my ring fingers I used two coats of Party Time Blue by N.Y.C., which is a deep blue jelly with red, blue and holographic silver glitter, over one coat of Cool Blue. I finished the nails with Limited Collection Matte Top Coat (Marks & Spencer).


I also have a 10% discount code for Born Pretty to share with you. If enough people use this code I will be sent some nail art goodies to review, so next time you are buying nail art supplies please take advantage of the discount by entering this code when you check out: PUNDX31

Monday, April 28, 2014

The Lacquer Legion Challenge - Bollywood Glam


The prompt for this April's Lacquer Legion Challenge is "GLAM".

I just couldn't feel inspired by this prompt to begin with. I am a very un-glam person and I'm not very interested in things that most people would consider glamorous.

In the end I found inspiration on my doorstep. One of the things I love most about living in the area I do is that there is a large Pakistani and Indian population which makes the place seem rather exotic to me, partly because I grew up in a tiny rural village. In my neighbourhood there are many shops selling beautiful imported fabrics, stores specialising in Asian designer fashions and jewellers selling stunning gem-set gold jewellery. It is a goldmine of inspiration for nail art.

On special occasions many of the local women wear brightly coloured and intricately embroidered clothes, often featuring stunning beadwork and rhinestones, usually worn with an amazing bejewelled pair of shoes and impeccable makeup. If these ladies aren't glam, I don't know who is! This post should really be called "Daubhill Glam", but I doubt anyone reading this would have a clue where Daubhill is or what it has to do with red, rhinestone encrusted nails.


As I have recently cut my nails very short I decided to use some long oval false nails for this nail art so I'd have more room for sparkly stuff. I used Jess polish in shade Hot Date (Poundland), a shimmery red, for the base colour. I used a gold P.S. Love nail art pen (Primark) to draw a semicircle at the base of the nails and stuck red and silver rhinestones (from the Nail Art Get Creative set) and gold caviar beads (Poundland) to it while it was still tacky. I drew a paisley shape using the gold nail art pen and used a cocktail stick to place caviar beads individually around the edge then stuck down more rhinestones in the centre using blobs of gold polish. I finished everything with a coat of Konad Special Top Coat.


I am a bit annoyed that after all my work the top coat took the gold colour off some of the caviar and left it silver, but I am still quite pleased with these nails even though I don't think I can really pull this look off. The red and gold together make me think of bridal outfits in Bollywood films. I only kept these on long enough to take the photos because the length was driving me crazy. I have no idea how anyone copes with having long nails. I'd end up losing an eye!


What do you think? Did you do any glam nail art for the Lacquer Legion Challenge this month?

Thursday, April 24, 2014

More Beaded Nail Ideas


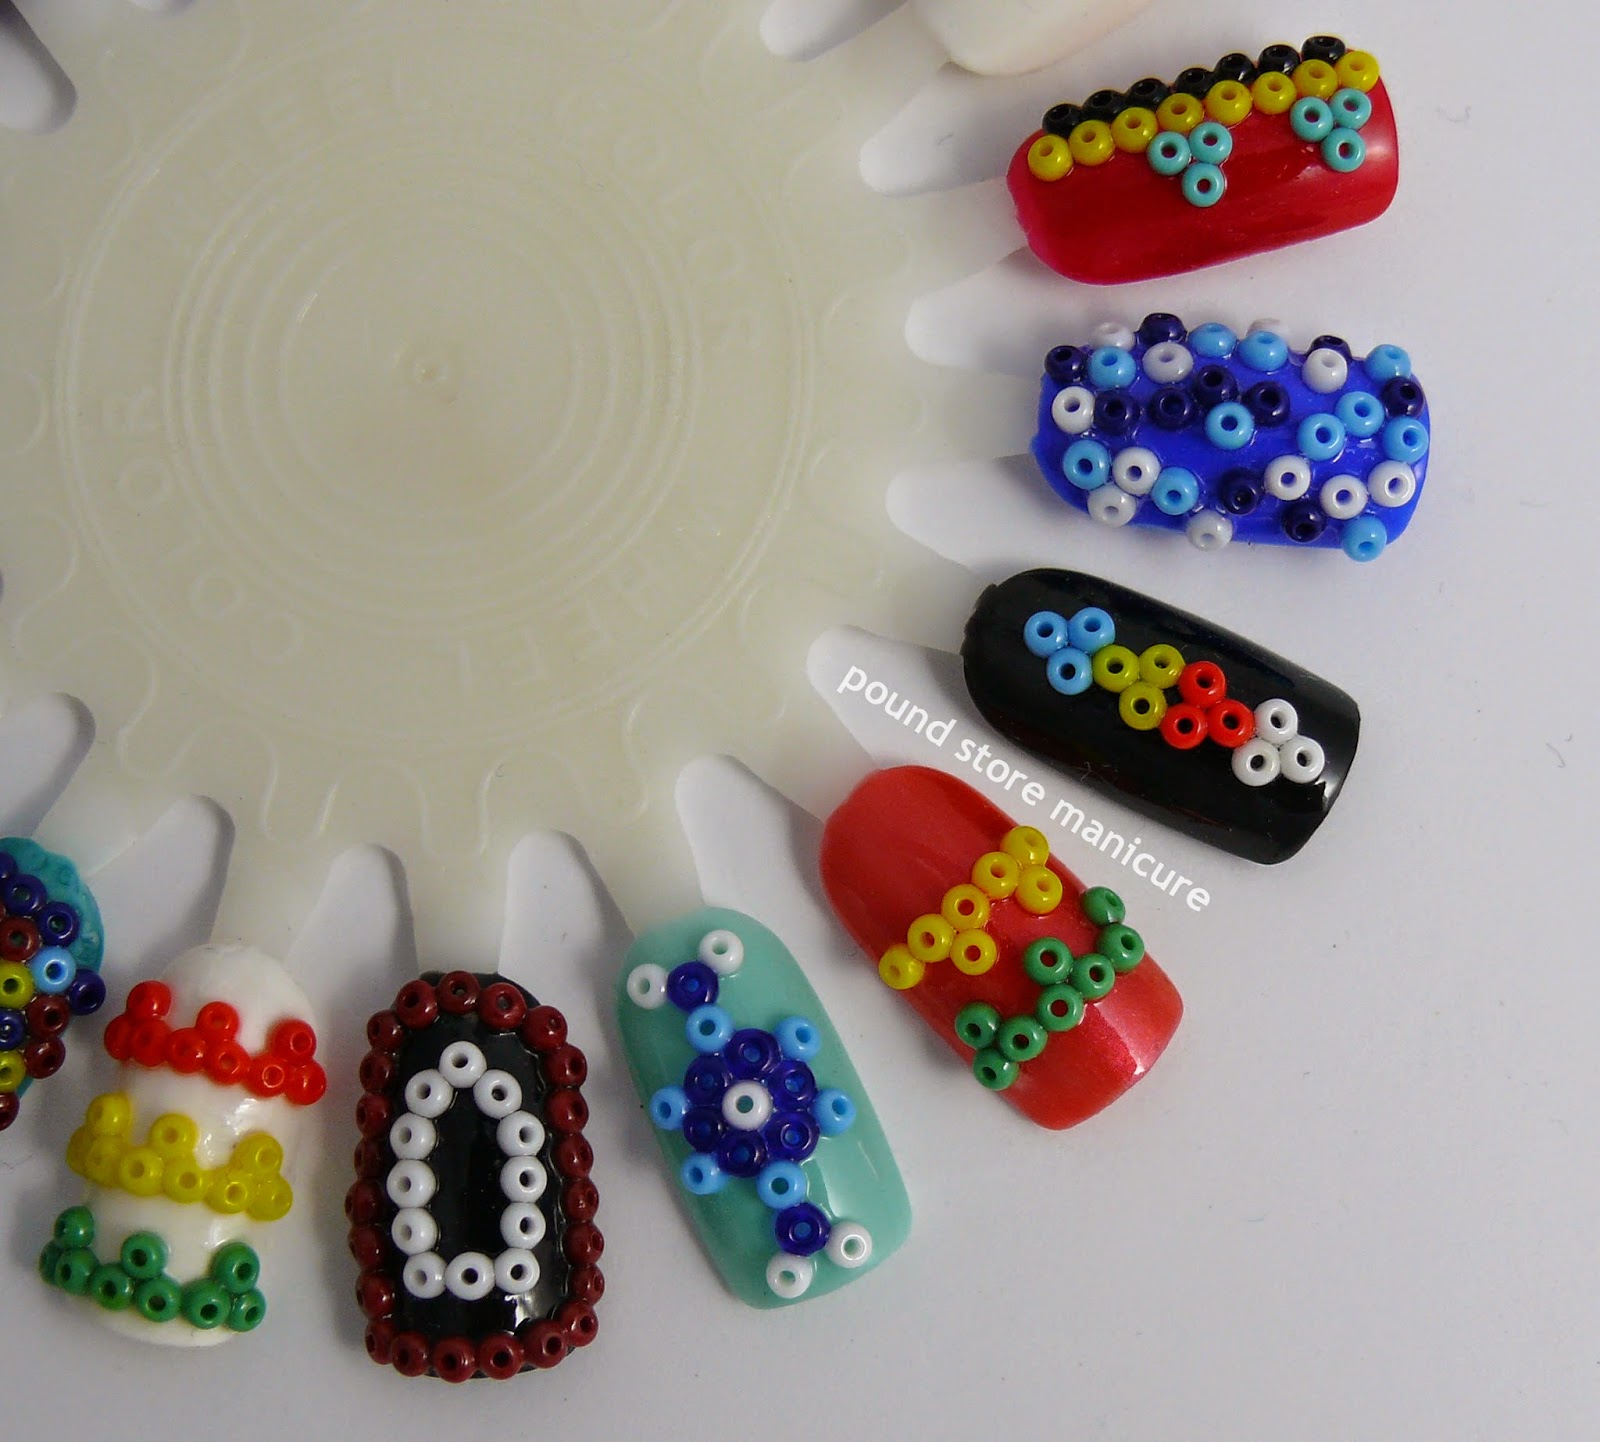
I made a wheel of beaded nail art designs using the same technique I used for my tribal beaded nails. 


My damaged index fingernail split yesterday so I've had to cut my nails very short again, so at the moment there isn't much room for elaborate beaded nail art (or much else) on my natural nails. Luckily I have some false nails so I might use those for my next few posts.

Wednesday, April 23, 2014

Primark Nail Art Pens


On Monday I braved the bank holiday crowds and headed to Primark to pick up some nail art pens. I'd read some good reviews of the P.S. Love nail art pens so I had to try them for myself.

There are two types of nail art pen available in Primark. The P.S. Love sets which cost £2 for a pack of three and are available in a Silver/Gold/Turquoise pack, which I bought, and a Black/White/Pink pack, which had all sold out in my local store. Primark also has some packs containing two slightly smaller nail art pens with a tube of matching rhinestones attached to the base of each one, also for £2. These nail art pens are not P.S. Love and are labelled Nail Art Get Creative. They were only available in a White/Red pack (other colours may be available). I'd not read any reviews of these pens but I thought I'd give them a try.

The lids and nibs of the pens are identical for the two types of nail art pen, consisting of a unscrewable striping brush section and above that a push-fit lid covering a thin metal nib. The pen tubes are squeezy, so be careful not to squeeze them as you remove the pen lids (which are tight fitting) otherwise you'll squirt polish everywhere. It is also important that when you are removing and replacing the lids you keep them directly in line with the nib to avoid bending the thin metal. You use the pens by gently squeezing the tube as you draw. The harder you squeeze, the thicker and blobbier the line you draw will be. There is no need to press the nib onto the surface of your nail as you would with a marker pen (you'd probably damage them that way), just gently touch the surface with the nib. As you can see in the photo below there is a little imperfection in the plastic moulding near the nib on some of the pens, but this doesn't affect the way they work at all.


The P.S. Love nail art pens are really excellent, just as the reviews I'd read claimed. The turquoise polish is totally opaque even over black, and the gold and silver are almost as opaque. The P.S. Love pens have exactly the right consistency to draw neat, thin lines and are a pleasure to use. It took me a while to get the hang of it, but by applying just a tiny bit of pressure you can draw lines almost as thin as a fineliner pen.

The Nail Art Get Creative pens contain slightly less polish and the formula is not nearly as good as the P.S. Love pens. The polish is very thin and runny which means it is harder to control the flow and the nibs splutter regularly, spraying flecks of polish and creating bubbles. Because the formula is so thin it also dissolves your base polish slightly which can muddy the colour of your lines. The white pen is significantly better than the red pen, and although it is difficult to use it is quite opaque over black. The red pen is not opaque at all and will only be useful over bases that are lighter than it, and it is so runny that it is almost impossible to draw neatly or do any detailed work with it. I imagine I will get some use out of the white pen (albeit while swearing at how difficult to use it is), but I probably won't be using the red pen again. I might try refilling the tube of the red pen with a more opaque polish from my collection to see how that works. At least these pens came with lots of sparkly red and iridescent silver rhinestones I suppose!

The picture below shows the lines that the different pens draw. I'm afraid it's not the neatest nail art but I was still getting used to squeezing the pen as I was drawing.


So, my verdict is buy the P.S. Love nail art pens! They are fantastic and a very low price for the quality you get. I know I'll be picking up the Black/White/Pink set when they get more in stock. I wouldn't bother with the Nail Art Get Creative pens, they will only disappoint.

Tuesday, April 22, 2014

The Weekly Haul - Ooooh, All The Pretty Colours!

I've acquired quite a few new polishes in the last week. I'm not sure when I last managed to stick to my £2 weekly polish budget. Oops! As I have so much to show you this week, I've swatched everything on fake nails instead of my own fingernails. The pound shops are full of lovely polishes at the moment, so empty out your penny jar and treat yourself!


The most exciting purchases I made in the last week were three more Sally Hansen Sugar Coat polishes from Poundworld. If you love textured polishes, get to your nearest Poundworld as soon as you can! They are currently selling some unusual Sugar Coat shades I haven't seen in a pound store before, including some shimmery and glittery ones. I picked up Candy Corn which is a bright orange, Red Velvet which is a deep pinky-red raspberry shade with a shimmery finish, and Royal Icing, my favourite, which is a gorgeous cool pastel blue with holographic micro glitter. It is so sparkly and icy looking and I know that Royal Icing is going to be great for wintery nail art! Swatches are two coats of polish, as recommended on the bottles. Red Velvet and Royal Icing are both less opaque than most of the Sugar Coat shades so you might actually need to use three coats.

Candy Corn:


Red Velvet:

Royal Icing:


Both Poundland and Poundworld are also selling a lot of Rimmel 60 Seconds polishes in a wide range of shades at the moment. I picked up Jungle Fever, a forest green, from Poundworld and Captain Khaki, a dark khaki-brown from Poundland. I always find that the Rimmel 60 Seconds polishes need two coats for full opacity (even though they claim to be one-coaters on the bottle), but they do dry quickly and I love the wide, flat Rimmel brushes because they are so easy to use. Swatches are two coats.


Poundland is currently full of bottles of polish by a brand I'd never heard of called Filthy Gorgeous. After a quick google I discovered that the polishes were launched a few years ago by a company that ran Debenhams in-store beauty salons. Apparently they are professional quality polishes and were sold in Debenhams for £9 a bottle. I'm assuming the company is no longer trading as their website has vanished, their social media accounts fell silent about a year ago and there is no longer any mention of them on the Debenhams website. I picked up Breeze, a light grey shade, and it does feel like a quality polish. It's a two-coater that applies very smoothly and comes in a cute round bottle with a lace design and plectrum charm on the cap. They have other shades available too and at £1 they are a bargain. Swatch is two coats.


I also picked up a new Jess shade. Bolton Poundland has finally got a few of the shimmery and iridescent shades in stock, although they have flown off the shelves and there were only one or two bottles left by the time I found them. I picked up Hot Date, a shimmery rich red. It's less opaque than the Jess cremes and is really stinky, unlike the cremes. It really is the smelliest polish I own, but it applies smoothly and dries quickly to a lovely finish. I do hope they get another delivery of Jess polishes soon because I keep seeing such gorgeous shades swatched online and they never seem to get any of them at my local Poundland. Swatch is three coats on the left, two coats on the right.


I spent my Easter Sunday afternoon swatching and labelling all the polishes in my collection on plastic nail wheels and discovered that I own just over three and a half wheels worth of polish, which is 74 shades. It seems like such a measly amount of polish when I compare it to most nail bloggers. This can only mean that I need more polish! Bwahahaha!


How many bottles of polish do you own?

Saturday, April 19, 2014

Earthy Earth Day Nails


This is the nail art I created for the Earth Day challenge on Nailpolis. It was supposed to be leaves and vines in a style inspired by Aboriginal Australian art. I quite like the nails but they didn't turn out quite the way I'd planned and I don't think they scream Earth Day. Oh well.

I used Rimmel 60 Seconds in shade Captain Khaki for the base. Poundland have a lot of Rimmel polishes in stock at the moment so I picked this shade up on Friday when I realised I didn't own any earth-tone polishes to use for my Earth Day nails.

I used a dotting tool and NYC High Line Green, Maybelline Pow Green, MUA All Nude and Technic Canary to do the designs. I used Limited Collection Matte Top Coat to finish them off.


I think the most surprising thing about this nail art is that I now own a dark khaki-brown nail polish. Yuck!

What's the ugliest shade of nail polish you own?

Friday, April 18, 2014

Tribal Beads


I am loving all the African and Aztec inspired clothes and accessories in the shops at the moment, particularly the beaded jewellery and bags. I wondered if I could use seed beads to do some tribal nail art so I got out my craft supplies and began to experiment. I am happy with how well it worked. It's really easy to do so I even managed to make my right hand look the same as my left.

To create beaded nails like this you will need a polish for your base colour, a fast drying top coat, a slower drying clear polish, a cocktail stick or toothpick, a pin and a whole lot of glass seed beads. I used size 11 beads (the most common size) and it is important to remember that with seed beads the higher the number, the smaller the bead. Packs of assorted size 11 seed beads are available from craft shops or ebay, but can often be found cheaper from pound shops, discount book shops (like The Works) or market haberdashery stalls.


I started with two coats of Jess polish in shade All That Jazz (Poundland exclusive) for the base. I applied the beads one nail at a time, first applying a coat of clear L.A.Colors polish (£1 from my local pharmacy) and then placing the beads one by one onto the wet polish using a cocktail stick dipped in clear polish. You don't want to push the cocktail stick through the hole of the bead as this makes sticking the bead to the nail difficult, you just want to pick up the beads by gently touching them with the tacky tip of the stick. When you've created the desired pattern, press the beads gently with a finger to firmly stick them in place.

Once you've stuck beads to all your nails, apply a thick coat of the fast drying topcoat totally covering the whole nail and the beads. I used Konad Special Top Coat. Air bubbles will form inbetween the beads and in the holes so quickly take a pin and pop as many as you can before the top coat starts to dry. Repeat this for every nail and once the top coat is dry the beads will be stuck fast.


I was worried that I'd lose beads during the day, but after 24 hours of wear including a lot of shopping and handbag rummaging, all the beads were still in place. I did keep getting my nails caught in my hair and snagging my clothes on them though, so they aren't the most practical nail embellishments. I'm going to look for some even smaller size 15 seed beads because I think they would be easier to wear.

I'm pleased with the way my beaded nail experiment worked out. I even got a compliment on these nails from a shop assistant while I was buying my weekly nail polish haul today!

What do you think of the idea of using seed beads for nail art? Is it something you would try?